In today’s online world, security is a top priority. Every website needs to protect its users’ data and establish trust, which is where SSL certificates come in. An SSL (Secure Sockets Layer) certificate encrypts the connection between your website and its visitors, ensuring that sensitive information like passwords, credit card details, and personal data are transmitted securely. Without an SSL certificate, browsers will flag your website as “Not Secure,” which can deter visitors and damage your online reputation.
This is where Let's Encrypt comes into play. Let’s Encrypt is a free, automated, and open certificate authority that provides SSL certificates to anyone who needs them. Its goal is to make web encryption widespread and accessible, without the cost or complexity that traditionally came with SSL certificates. However, SSL certificates issued by Let’s Encrypt come with an expiration date, typically 90 days, and if not renewed on time, your website could suddenly lose its secure status.
Manually renewing SSL certificates every few months can be a hassle, especially if you manage multiple domains. Fortunately, if you’re using Plesk, the process becomes incredibly easy. Plesk’s built-in integration with Let’s Encrypt automates SSL certificate issuance and renewal, so you can rest assured that your website remains secure without needing to intervene.
This blog post will guide you through the steps to automatically renew Let’s Encrypt SSL certificates using Plesk, ensuring your site’s encryption is always up to date. We’ll also dive into how DNS management affects auto-renewal, especially if you're using wildcard certificates or external DNS servers, and how you can navigate these challenges seamlessly.
Setting Up Let's Encrypt SSL in Plesk
Securing your website with SSL encryption is an essential step in building trust and protecting user data. Fortunately, Plesk makes it easy to install and manage Let's Encrypt SSL certificates with just a few clicks. Here’s a step-by-step guide on how to set up Let's Encrypt SSL for your domain in Plesk.
Step 1: Log in to Your Plesk Account
After logging into your Plesk account, navigate to the Websites & Domains section. Here, you’ll see a list of your domains. Select the domain for which you want to install the Let's Encrypt SSL certificate.
Step 2: Access the SSL/TLS Certificates Menu
Once you’ve selected the domain, click on SSL/TLS Certificates from the list of options. This will take you to the SSL management section, where you can view, install, or reissue SSL certificates for the chosen domain.
Step 3: Installing or Reissuing a Let's Encrypt SSL Certificate
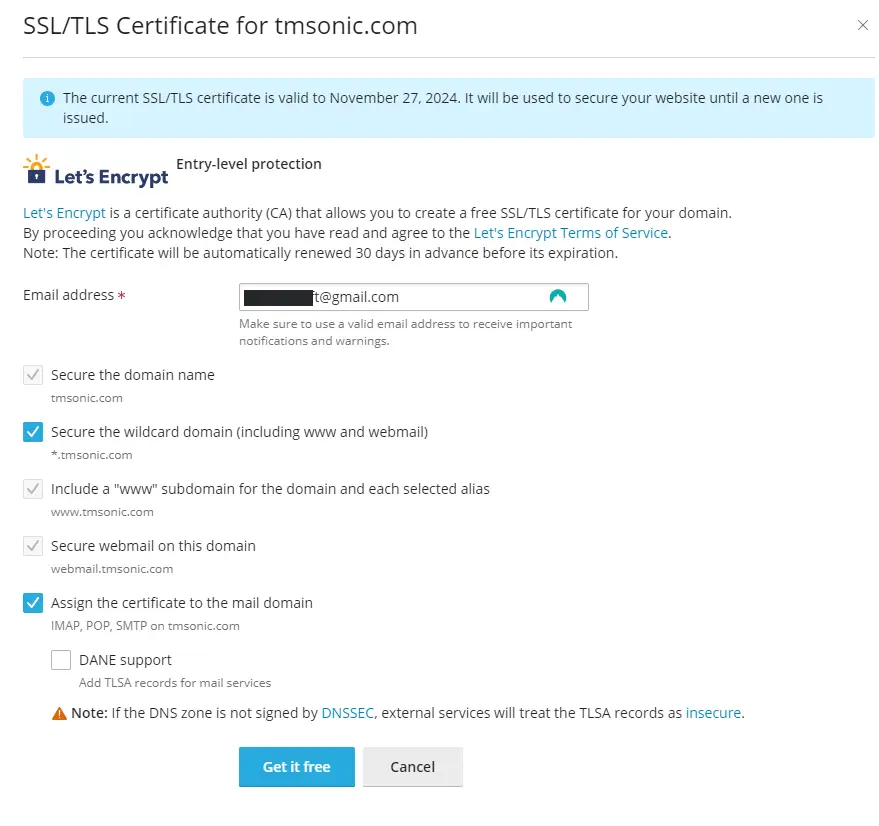
In the SSL/TLS Certificates menu, you’ll see an option to Get it free through Let's Encrypt. This will allow you to install or reissue an SSL certificate for your domain. As shown in the image, you’ll be prompted to fill out a few key details to ensure the certificate is set up correctly.
Step 4: Configuring Let's Encrypt Options (Explained)
Here are the options you'll encounter when setting up the certificate:
-
Email address: This field requires a valid email address to receive important notifications, such as expiration warnings or any issues with renewal.
-
Secure the domain name: This checkbox ensures that the main domain, in this case tmsonic.com, is protected by the SSL certificate.
-
Secure the wildcard domain (including www and webmail) (*.tmsonic.com): By selecting this, you’ll protect all subdomains of your site (such as www.tmsonic.com, webmail.tmsonic.com, etc.) under a single certificate. Wildcard certificates are crucial if you have multiple subdomains and want them all secured.
-
Include a "www" subdomain for the domain and each selected alias: This option ensures that the www version of your domain is also secured by the SSL certificate.
-
Secure webmail on this domain: Select this if you want to encrypt the communication for your webmail client, ensuring all data sent via webmail is secured.
-
Assign the certificate to the mail domain (IMAP, POP, SMTP on tmsonic.com): This option allows the SSL certificate to secure mail services for your domain, covering IMAP, POP, and SMTP protocols.
-
DANE support: This is an advanced option for users who want to add TLSA records for mail services. However, this is only recommended if the DNS zone is signed by DNSSEC.
Note: If the DNS zone is not signed by DNSSEC, external services will consider TLSA records insecure, which may impact email delivery or security.
Step 5: Finalizing the Installation
Once you've filled out the form and selected the options you need, click on Get it free to install the Let's Encrypt SSL certificate. The certificate will be generated and applied to your domain within moments.
Auto-Renewal of Let's Encrypt SSL Certificates
The beauty of Let's Encrypt certificates in Plesk is that auto-renewal is built in by default. You don't need to manually enable it. Plesk will automatically renew the certificate 30 days before it expires, provided there are no issues with DNS validation.
If your DNS is managed directly by Plesk, auto-renewal works seamlessly.
If you're using wildcard certificates and your DNS is managed externally, manual intervention may be required during the renewal process due to DNS validation needing a new DNS record.
Challenges with External DNS Servers
When it comes to automatically renewing Let's Encrypt SSL certificates, Plesk is designed to handle everything smoothly—as long as your DNS is managed by Plesk. However, if your DNS records are hosted externally, things can get tricky. Let’s break down why auto-renewal might fail and the challenges you could face.
Why Auto-Renewal May Fail with External DNS Servers
If your domain's DNS records are managed by an external DNS provider, rather than within Plesk, the system loses the ability to automatically control DNS validation—a critical step in the SSL certificate renewal process. Let's Encrypt uses DNS-based validation (DNS-01) to verify that you control the domain before issuing or renewing a certificate.
When Plesk manages your DNS, it can automatically update DNS records as needed during the renewal process. However, if the DNS is hosted outside of Plesk, Plesk cannot directly interact with those records. As a result, the automatic renewal might fail, and manual intervention is often required to ensure successful certificate updates.
Problems with DNS Validation When Using External DNS
The key problem here lies in DNS validation. For non-wildcard certificates, HTTP-based validation (HTTP-01) is sufficient, which Plesk can handle easily by serving a validation file. But if your DNS is external and you're using wildcard certificates (which require DNS validation), every renewal attempt will fail unless you manually update the DNS TXT records.
Another common issue is delays in DNS propagation. If Plesk can’t confirm that the new validation records are live, the renewal process won’t proceed, leaving your certificate to expire unless you act fast.
The Need for Manual Intervention
To prevent certificate expiration when using an external DNS provider, you’ll need to be hands-on. For each renewal attempt, you’ll have to manually update your DNS records (usually TXT records) and ensure they propagate properly. This manual process must be repeated for every renewal period, making it much more cumbersome than the seamless auto-renewal you would enjoy with Plesk-managed DNS.
Handling Wildcard Certificates: DNS Validation Requirement
Wildcard certificates are a convenient way to secure multiple subdomains with a single SSL certificate. Instead of having to install a separate certificate for each subdomain (e.g., mail.yourdomain.com, blog.yourdomain.com, www.yourdomain.com), a wildcard certificate covers them all under a single umbrella, such as *.yourdomain.com. However, with convenience comes additional complexity, particularly when it comes to validation and renewal.
Why DNS Validation Is Required for Wildcard Certificates
Wildcard certificates require a special kind of validation called DNS-01 validation, which means Let’s Encrypt will verify your domain ownership by checking for a specific DNS record. Unlike regular certificates, which can often be validated with HTTP-01 (via a web server), wildcard certificates must be validated via DNS because they are securing an unlimited number of subdomains. This makes DNS the only viable method of ensuring ownership of the entire domain and all of its potential subdomains.
Manual Updates for Every Renewal
The process of renewing wildcard certificates with external DNS involves the following manual steps for each renewal:
- Plesk will attempt to renew the wildcard certificate and notify you that DNS validation is required.
- You will need to log in to your external DNS provider’s control panel and manually create or update a DNS TXT record with the value provided by Let's Encrypt.
- After making this change, you’ll need to wait for DNS propagation to complete (which can take time depending on your provider).
- Once the record has propagated, Plesk will complete the renewal.
It’s important to remember that every renewal requires a new DNS TXT record—the previous one won’t be reused. This adds an extra layer of responsibility for maintaining your site’s SSL security.
Conclusion
When using external DNS servers, SSL certificate auto-renewal in Plesk becomes more complicated, particularly if you're dealing with wildcard certificates. While Plesk can handle automatic renewals without issue for domains it fully controls, using external DNS introduces manual steps, such as updating DNS TXT records, that must be performed during each renewal cycle. For a seamless experience, managing your DNS within Plesk ensures trouble-free automatic SSL renewals, particularly if wildcard certificates are involved.